Installation Guide
The Meroxa CLI is necessary to take action on the Conduit Platform and with Conduit Applications. Meroxa currently provides pre-built binaries for the following operating systems:
macOS or Linux
For MacOS and Linux operating systems we recommend using Homebrew to manage installation and updates.
Use brew tap and brew install to download and install using Homebrew.
brew tap meroxa/taps && brew install meroxa
Verify that meroxa was successfully installed by using meroxa version. A successful installation will result in the following output:
meroxa/2.23.0 darwin/amd64
You may also manually download the binary directly from our releases on GitHub.
Once downloaded, there are two common ways to install. You can place the binary in either of the following directories:
/usr/local/bin$HOME/bin
Using /usr/local/bin
cd /usr/local/bin
Followed by:
tar xopf ~/Downloads/meroxa_version_filename.tar
To verify installation run ./meroxa version.
To run meroxa without the ./, you will need to add $HOME/bin to your $PATH.
Determine your default shell (zsh or bash).
echo $SHELL
Edit your shell profile.
If your default shell is zsh:
nano ~/.zshrc
If your default shell is bash:
nano ~/.bash_profile
In ~/.zshrc or ~/.bash_profile add the following line to the file:
export PATH=$PATH:$HOME/bin
Save the file by pressing Control + X, then confirm with Y.
Run source ~/.zshrc or source ~/.bash_profile to pick up the changes to your shell profile.
Verify the change by running meroxa version.
Windows
For Windows operating systems we recommend downloading the binary directly (steps below) or through Scoop.
Create the directory
You can specify the name and location of the new directory.
mkdir meroxa
Make it your working directory
cd meroxa
Extract the tarball
Once downloaded, extract the files to a directory of your choice. Windows 10 & 11 consists of native support for tar that you can use with Command Prompt to extract these files.
tar -xvzf ~/Downloads/meroxa_x.xx.x_windows_arm64.tar.gz -C meroxa
If the tar command does not work, you can use third-party software to extract compressed files. We recommend using 7-Zip.
- Open 7-Zip webpage and download either 32 or 64-bit 7-Zip version based on your System Type.
- Once downloaded, open the 7-Zip installer to install the software to your Windows system.
- Locate the TGZ file and select then right-click the TGZ file, hit 7-zip, and press the Extract files.
- You will see a new folder path is already included in the ‘Extract to’ text box. But if you want you can modify this path as required.
- Once extracted, you can double-click the extracted TAR folder to open and view content.
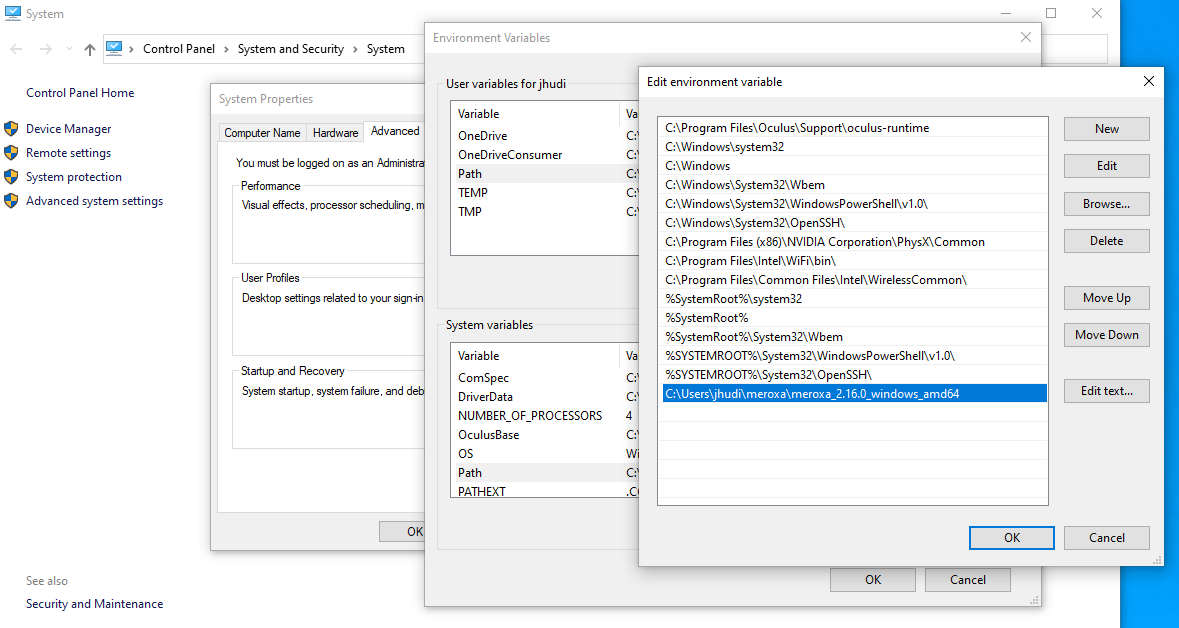
Adding Meroxa CLI Binary to PATH (Windows)
To verify installation, you can run meroxa version. To run the meroxa command in your command prompt, add the Meroxa CLI binary to your path settings.
- Go to your Control Panel > System & Security > System > Advanced System Settings > Environment Variables.
- Under System Variables: Select Path and click Edit Environment Variable to add the Meroxa CLI binary files. Press OK.
- Open the command prompt to verify Meroxa CLI installation by running
meroxa version. The CLI will print out the Meroxa CLI version in the following format:
meroxa/2.23.0 darwin/amd64