Snowflake
Snowflake is an enterprise-ready cloud Data Warehouse. It can be used as a downstream resource in your Turbine streaming apps by using the write function to a select table in a database.
Setup
Create Snowflake User
Meroxa uses Key Pair Authentication to access your Snowflake account. The following steps guide you through creating a public/private key pair, a meroxa_user user, and associating the public key to your user appropriately.
- Generate a private key:
openssl genrsa 2048 | openssl pkcs8 -topk8 -v2 des3 -inform PEM -out rsa_key.p8
For more details, see: Snowflake Docs: Generate the Private Key
- Generate a public key:
openssl rsa -in rsa_key.p8 -pubout -out rsa_key.pub
For more details, see: Snowflake Docs: Generate the Private Key
-
Create a new user within Snowflake with the username
meroxa_user. -
Using a Snowflake Worksheet, assign the public key to the user:
-- Set public key for authentication to user
ALTER USER meroxa_user SET RSA_PUBLIC_KEY = "$SNOWFLAKE_PUBLIC_KEY"
$SNOWFLAKE_PUBLIC_KEY is the public key you created in step #2.
When adding the public key, exclude the public key delimiters (-----BEGIN PUBLIC KEY|-----END PUBLIC KEY) in the SQL statement. For example:
ALTER USER meroxa_user SET RSA_PUBLIC_KEY ='MIIBIjANBgkqh...';
Create and Configure Snowflake Database
Next, using Snowflake Worksheet, we can run commands to setup our database instance correctly.
Important note: Instead of copy-pasting all subsequent commands into your worksheet and running them at once, make sure to run each command separately and verify that the status message below your worksheet indicates that it was executed successfully. Otherwise only the first line of your worksheet will be applied, leaving your database setup incomplete.
You can append a new line to your worksheet after each run to document which commands have already been executed.
Run the following three commands one after another to create a new Snowflake Database called meroxa_db.
-- Use a role that can create databases
USE ROLE accountadmin;
-- Create new database
CREATE DATABASE meroxa_db;
USE meroxa_db;
The following command will create a new Snowflake Schema called stream_data:
CREATE SCHEMA stream_data;
Run the next statement to create a new Snowflake Role called meroxa_platform_role.
-- Create a Snowflake role with the privileges to work with the connector.
CREATE ROLE meroxa_platform_role;
Run all of the following commands after each other to grant the necessary privileges to the above meroxa_platform_role role:
-- Grant privileges on the database.
GRANT USAGE ON DATABASE meroxa_db TO ROLE meroxa_platform_role;
GRANT USAGE ON SCHEMA stream_data TO ROLE meroxa_platform_role;
GRANT CREATE TABLE ON SCHEMA stream_data TO ROLE meroxa_platform_role;
-- Grant access to stage data
GRANT CREATE STAGE ON SCHEMA stream_data TO ROLE meroxa_platform_role;
GRANT CREATE PIPE ON SCHEMA stream_data TO ROLE meroxa_platform_role;
Finally, you can assign meroxa_user the respective role meroxa_platform_role to be able to create your resource on the platform:
-- Grant the custom role to an existing user.
GRANT ROLE meroxa_platform_role TO USER meroxa_user;
ALTER USER meroxa_user SET DEFAULT_ROLE = meroxa_platform_role;
Once you have run each of the commands mentioned above, your worksheet should show no errors and finally look as follows:
-- Use a role that can create databases
USE ROLE accountadmin;
-- Create new database
CREATE DATABASE meroxa_db;
USE meroxa_db;
CREATE SCHEMA stream_data;
-- Create a Snowflake role with the privileges to work with the connector.
CREATE ROLE meroxa_platform_role;
-- Grant privileges on the database.
GRANT USAGE ON DATABASE meroxa_db TO ROLE meroxa_platform_role;
GRANT USAGE ON SCHEMA stream_data TO ROLE meroxa_platform_role;
GRANT CREATE TABLE ON SCHEMA stream_data TO ROLE meroxa_platform_role;
-- Grant access to stage data
GRANT CREATE STAGE ON SCHEMA stream_data TO ROLE meroxa_platform_role;
GRANT CREATE PIPE ON SCHEMA stream_data TO ROLE meroxa_platform_role;
-- Grant the custom role to an existing user.
GRANT ROLE meroxa_platform_role TO USER meroxa_user;
ALTER USER meroxa_user SET DEFAULT_ROLE = meroxa_platform_role;
Verify that your database instance is setup as expected by navigating to the Data > Databases tab.
You should see the meroxa_db listed including the stream_data collection.
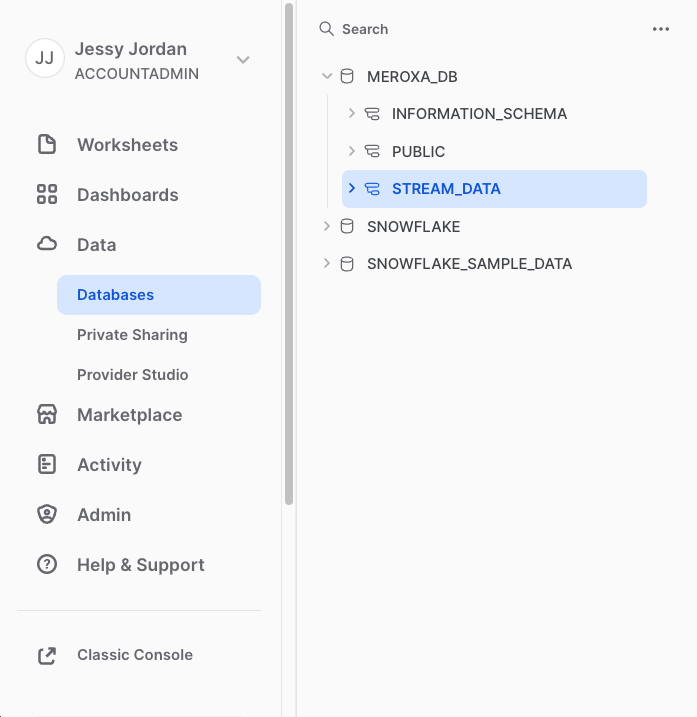
You may need to refresh the page if you can't see your database listed here, yet.
Limit Network Access to Snowflake Database
Optionally, you can restrict access to the meroxa_user to Meroxa’s IPs by creating a new network policy and assigning it to the meroxa_user.
Take a look at our Networking documentation for the latest list of Meroxa IPs and replace the $IPX placeholders
in the code example below with the respective address values.
Next, add the commands to a Snowflake Worksheet and run them line by line for them to execute successfully:
-- Use a role that can create databases
USE ROLE accountadmin;

CREATE NETWORK POLICY ALLOW_MEROXA_IPS ALLOWED_IP_LIST =
    ('$IP1', '$IP2');

ALTER USER meroxa_user SET NETWORK_POLICY = ALLOW_MEROXA_IPS;
Resource Configuration
Use the meroxa resource create command to configure your Snowflake resource.
First, save your private key in a variable so you could use it below in the CLI:
SNOWFLAKE_PRIVATE_KEY=$(cat rsa_key.p8)
The following example depicts how this command is used to create a Snowflake resource named snowflake with the minimum configuration required.
$ meroxa resource create snowflake --type snowflakedb --url "snowflake://$SNOWFLAKE_URL/meroxa_db/stream_data" --username meroxa_user --password $SNOWFLAKE_PRIVATE_KEY
In the command above, replace the following variables with valid credentials from your Snowflake environment:
$SNOWFLAKE_URL
You can find the account url of your Snowflake data warehouse, which is referenced as $SNOWFLAKE_URL in the example above,
in the Snowflake UI. Navigate to your account, click your account name in the bottom left corner of the page and copy the url from the tooltip menu:
For more information, see also the documentation on the Snowflake Account URL
$SNOWFLAKE_PRIVATE_KEY
The $SNOWFLAKE_PRIVATE_KEY is equivalent to the value of the rsa_key.p8 key file that was created in the previous step.
If you're using a previously created Snowflake database instance of your own, make sure that the private key you're using here, matches the public key of the user that you're trying to authenticate with.
Or simply visit our Meroxa Dashboard to do that on https://dashboard.meroxa.io/resources/new.