Setup & Installation
Everything you need to know to get started with the Meroxa Platform and Turbine Application Framework.
Getting a Meroxa Account
If you don't already have a Meroxa account, request a demo.
Git Installation
Ensure Git is installed and set up locally on your machine. You can check by running git --version. If not installed, refer to the following installation and set up guides:
Meroxa CLI Installation
The Meroxa CLI is necessary to take action on the Meroxa Platform and with the Turbine Framework. Meroxa currently provides pre-built binaries for the following operating systems:
See the latest release for the Meroxa CLI on GitHub.
Mac OS & Linux
Using Homebrew
For MacOS and Linux operating systems we recommend using Homebrew to manage installation and updates.
- Use the combination of
brew tapandbrew installto download and install the Meroxa CLI using Homebrew.$ brew tap meroxa/taps && brew install meroxa - Verify that
meroxawas successfully installed by running the commandmeroxa version.
The CLI will print out the Meroxa CLI version in the following format.$ meroxa versionmeroxa/2.18.0 darwin/amd64You may also download the binary directly from our releases on GitHub.
Using a Meroxa CLI binary
You may also download the Meroxa CLI binary directly from our releases on GitHub.
- Once downloaded, there are two common ways to install. You can place the binary in either of the following directories:
/usr/local/bin$HOME/bin
- In the following examples we will use
/usr/local/bin. Run the following commands:cd /usr/local/bin $ tar xopf ~/Downloads/meroxa_version_filename.tar - Once the installation is in
/usr/local/binyou will need to verify installation by running./meroxa version.$ ./meroxa version - To run
meroxawithout the./, you will need to add$HOME/binto your$PATHtake next following steps. - Determine your default shell (zsh or bash).
$ echo $SHELL - Edit your shell profile.
- If your default shell is
zsh.
$ nano ~/.zshrc- If your default shell is
bash.
$ nano ~/.bash_profile - If your default shell is
- In ~/.zshrc or ~/.bash_profile add the following line to the file.
export PATH=$PATH:$HOME/bin - Save the file by pressing Control + X, then Y on your keyboard.
- Close your terminal and open a new terminal window to pick up the changes to your shell profile. Verify the change by running
meroxa version.$ meroxa version
Windows
For Windows operating systems we recommend downloading the Meroxa CLI binary on GitHub (steps below) or through Scoop. Once the Meroxa CLI binary is downloaded, extract the files to a directory of your choice.
$ mkdir meroxa
$ cd meroxa
$ tar -xvzf ~/Downloads/meroxa_2.18.0_windows_arm64.tar.gz -C meroxa
Windows 11/10 consists of native support for tar that you can use with Command Prompt to extract these files.
If the tar command does not work, you can use third-party software to extract compressed files. We recommend using 7-Zip and taking the following steps:
- Open 7-Zip webpage and download either 32 or 64-bit 7-Zip version based on your System Type.
- Once downloaded, open the 7-Zip installer to install the software to your Windows system.
- Locate the TGZ file and select then right-click the TGZ file, hit, 7-zip, and press the Extract files.
- You will see a new folder path is already included in the ‘Extract to’ text box. But if you want you can modify this path as required.
- Once extracted, you can double-click the extracted TAR folder to open and view content.
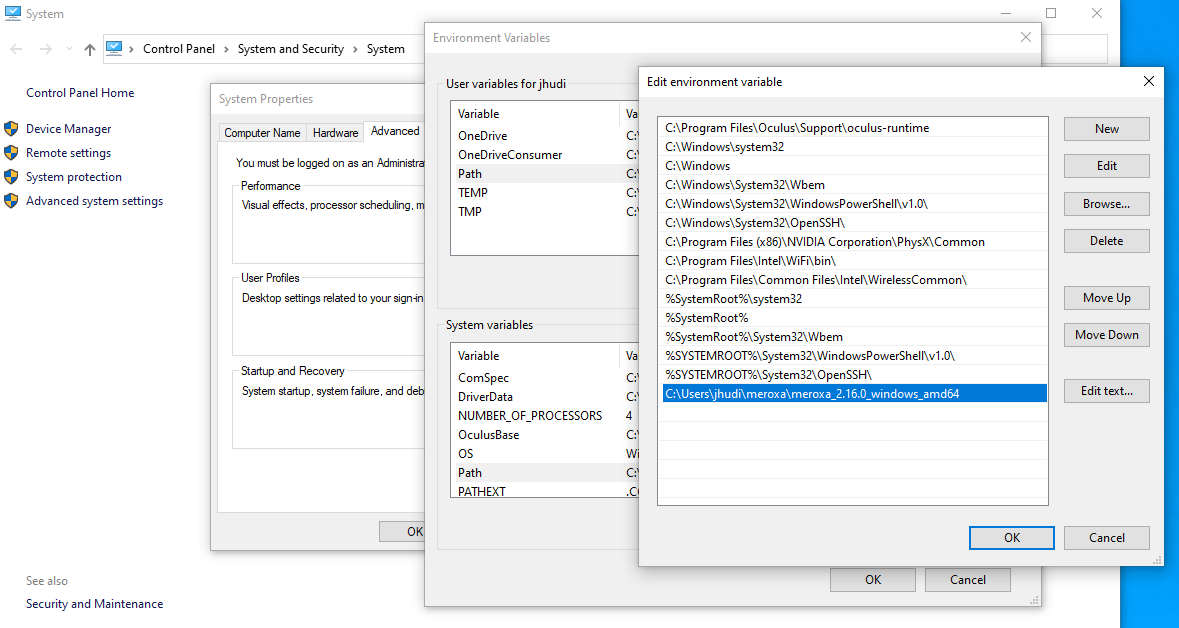
Adding Meroxa CLI Binary to PATH (Windows)
To verify installation, you can run meroxa version. To run the meroxa command in your command prompt, add the Meroxa CLI binary to your path settings.
- Go to your Control Panel > System & Security > System > Advanced System Settings > Environment Variables.
- Under System Variables, select Path and click Edit Environment Variable to add the Meroxa CLI binary files and press OK.
- Open the command prompt to verify Meroxa CLI installation by running
meroxa version.
The CLI will print out the Meroxa CLI version in the following format.$ meroxa versionmeroxa/2.18.0 darwin/amd64
Meroxa CLI Authentication
You can authenticate using the Meroxa CLI by running the meroxa login command.
$ meroxa login
The Meroxa CLI will automatically redirect you to the Meroxa dashboard login page where you will be asked to sign in.
Once you have successfully signed in you will see a confirmation printed in the Meroxa CLI:
You will now be taken to your browser for authentication or open the url below in a browser.
http://localhost:21900/oauth/callback
https://auth.meroxa.io/authorize?audience=https://api.meroxa.io/(redacted)
Successfully logged in.